REDCap: Recovering Deleted or Overwritten Record Data
Recovering Deleted or Overwritten Record Data
REDCap does not currently have an “undelete” function, but what it does have is a comprehensive project log that automatically tracks whenever a record is created, updated, or deleted. You can use this log as a reference to manually re-enter record data that has been deleted or overwritten.
Particularly if you have a lot of forms and fields, recovering data this way is a laborious process. This is one reason why we recommend making regular backups of your project data to a secure research drive, and why you should always make a backup prior to deleting record data or performing significant structural changes!
Instructions
- Log into REDCap and open your project.
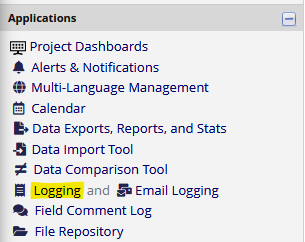
- In the Applications sidebar, check to see if you have an entry titled Logging:
- If this isn’t visible, your user does not currently have access rights for the Logging function. If you have the ability to amend your own User Rights, then you can grant yourself this access right; if you do not, you will need to consult with the project owner/maintainer.
- The logging screen is a reverse-date-ordered list of every interaction a user (or survey respondent) has ever had with your REDCap project. Most of this information is not relevant, so we will want to filter the list to only show entries related to the record that has had data deleted or overwritten.
- If the entire record has been deleted, then its record ID won’t be present in the Filter by record drop-down. Fortunately, this is easily fixed – create a new (empty) record, and rename it so it has the same record ID as the old, deleted record. Note that you will need to fill in at least one data field in the new record before REDCap will save it, so just pop a dummy value into the first data field on your first form.
- You should now see a complete list of all user interactions for the selected record:
(In this example, you can see that I deleted the record (ID 2), created a new record (ID 15) and then renamed it to ID 2 so we could “inherit” the log history for the original record 2.)
- Using the log as a reference, you can now look for the data that was deleted or overwritten and re-enter it, one field at a time.
For a record that was entirely deleted, this typically means scrolling to the end of the log and then working backwards up the list until you reach the point the record was first deleted.
For a record with partial data deletion, or one where some data was overwritten, you will need to identify the relevant portions of the log and make selective updates.
Practically speaking, the easiest way to do this is to have two REDCap windows open side-by-side, one with the log data, and the other with the data entry forms for the relevant record. You may prefer to export the log to Excel, delete any superfluous rows there, and then use that as your reference for re-entering data.
Possible Complicating Factors
Depending on how your project is configured, you may be impacted by one or more of the following:
- Automated Survey Invitations (ASIs)/Email Alerts. If your project collects data from participants via surveys, and you are recreating a deleted record, its possible that as you enter the deleted data you will trigger one or more survey invitations or alerts.
To prevent this, you can create one or more control fields on an admin form:
-and in your ASI or Alert logic include a clause that states to only send out the email if the relevant control field is not ticked (
[suppress_emails] <> 1in this example). - Randomisation. If you are using REDCap's randomisation function, and are recreating a deleted record that was already randomised, then if you re-randomise it, the record might be assigned to a different group.
Please contact the University of Melbourne REDCap support team at red-cap@unimelb.edu.au for assistance with this.

